The internet is a beautiful place but is often compared to the American wild-west, not without good reason. The internet allows nearly everyone and everything to connect to each other. The problem is that includes all things good and bad. It is no secret that every service and website is under constant scanning for flaws that an attacker can exploit. Don’t fret, there are a few simple steps you can do to improve your website’s security with Cloudflare. This blog assumes you already have Cloudflare setup for your domain, if you haven’t done that yet read our article on how to speed up your website with Cloudflare.
Cloudflare traffic classifications
Cloudflare has four ways to handle web traffic. Some automated protections are hard-set into a specific traffic class. However, for most things you can classify how Cloudflare handles the traffic:
- Block:
This directly blocks the connection and only shows a Cloudflare page telling the visitor (or bot) that they have been blocked from viewing the requested resource. - Challenge:
This pulls up a Cloudflare page which requires the visitor (or bot) to solve a captcha before they can view the requested resource. This helps block sophisticated bots which are more interactive with their attacks, which are already less likely to find. - JavaScript Challenge:
This is similar to the standard challenge, except it doesn’t require the solving of a captcha. Instead it issues a challenge which is solved by a client’s browser using JavaScript. This is typically mathematically intense and requires a few seconds of computation, but only requires a visitor to wait a few seconds. - Allow:
This allows the traffic to pass through and connect to the website.
Striking a balance
In a perfect world, we could always block every bot and allow good users without confusing either group for the other. Sadly that’s not possible. While you could put your entire website behind a captcha, you are likely to lose visitors quickly. It is important to decide what’s important to protect, and how strictly you want to protect it. We discuss this balance in some options below.
Set your challenge passage
Cloudflare remembers which visitors pass a challenge and will allow them to continue to visit the website unchallenged for a specified time period. You should adjust this to increase usability and decrease the frustration visitors may experience when being classified as dangerous. You can adjust this under “Firewall” and the “Settings” tab. I suggest setting this to 8 hours for your WordPress blog.
Block bots from accessing your website
WordPress is a jackpot for malicious attackers. Due to the flexibility WordPress provides, if an attacker is able to break into your install they can enslave your website to their will, attack your visitors, and steal your data.
Set your security level
Setting your security level applies a generic threat acceptance across your entire website. For a WordPress website, I would suggest either medium or high. You can change your security level under “Firewall” and selecting the “Settings” tab. Any traffic which violates the security level setting will be issued a JavaScript challenge. The various security levels are:
- Essentially Off: Challenges only the absolute worst attackers, the ones who are guaranteed going to hurt your website.
- Low: Challenges the most threatening attackers
- Medium: Challenges visitors with a medium threat level and the most threatening attackers.
- High: Challenges all visitors who have done anything suspicious across the entire Cloudflare network within the past two weeks.
- “I’m Under Attack”: This mode should only be enabled if your website is under a heavy targeted attack, it forces every single visitor, good or bad, to receive a JavaScript challenge.
Enable Cloudflare Bot-fight mode
One of the quickest changes you can make is to enable the Cloudflare “Bot-Fight” mode, which automatically issues a JavaScript challenge to known bots who are attempting to exploit your website. This is a safe option to enable because it’s unlikely to be tripped up by normal users.
You can enable bot-fight mode in your dashboard under “Firewall” and under the “Tools” tab.
Protect WP-Login
Most automated bots targeting WordPress will attack the login page. They typically look for exploits (which hopefully are not available if you’re up-to-date on your WordPress install) or to brute-force credentials. You can easily restrict these kinds of attacks by taking advantage of the Cloudflare firewall rules.
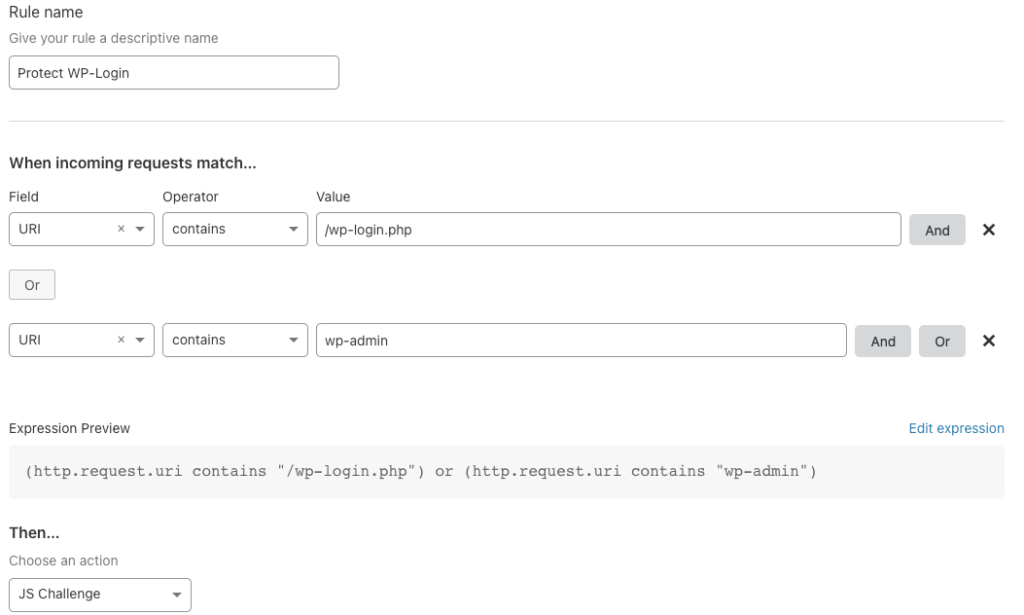
Under “Firewall”, select the “Firewall Rules” tab. Create a new rule and name it “Protect WP-Login”.
Under the “When incoming requests match..” section, input the following: Field: URI; Operator: Contains; Value: “wp-login”.
Next, scroll down to the “Then” section and either choose the JavaScript challenge or standard challenge. Review to our section above which explains the difference between the two challenges. Note: If you select allow, all traffic even if malicious will be permitted, and likewise selecting block will block anything (including you) from being able to log into your website. I would suggest starting with the JS challenge. If you notice many bots (unlikely) getting past the challenge, then upgrade it to a standard captcha challenge.
Effectiveness of the WP-Login firewall rule
My blog at the time of writing has no active visitor base and is rather small. Yet my Cloudflare logs have indicated over 200 unique attack attempts that have been blocked by the firewall rules. The challenge has a passing rate of 4%, which corresponds to the number of times I personally have been issued the challenge, proving that so far every automated attack has been blocked for free by Cloudflare, my webserver never saw the requests.
Advanced protections
If you want to go the extra step to receive the most out of Cloudflare, there are some further steps that require more effort and configuration that you can take.
Utilize Cloudflare Authenticated Origin Pull
Authenticated Origin Pulls are a free feature provided by Cloudflare which forces Cloudflare as the only thing that can communicate to your webserver. This is important as Cloudflare can provide a protective blanket over your website, but that doesn’t matter much if an attacker can directly contact your webserver, bypassing Cloudflare completely. Internet scanning regularly occurs, and it is not unreasonable to expect your direct webserver information to appear in a database somewhere.
Authenticated Origin Pulls must be enabled in your Cloudflare control panel under the “SSL/TLS” tab and the “Origin Server” sub-tab. Simply flick the switch to “on” and you’re done with the Cloudflare side of things. Finally, you need to configure your webserver to require the Cloudflare origin client certificate. You can find the instructions on how to perform this here. Unfortunately, if you are using a shared hosting provider it may not be possible to configure this. Contact your provider for more info if you are having difficulties.
Block non-Cloudflare IPs
The next step you can perform is to only allow Cloudflare’s servers to connect to your webserver. This is best achieved by restricting connections to your webserver’s port using a software firewall, and works great with Authenticated Origin Pull. All of the IPs utilized by Cloudflare can be found at https://www.cloudflare.com/ips/. An automated script to perform this on your server can be found here.
Enable TLS full strict mode
TLS (SSL) is one of the most important tools to ensure all data transmitted from a website is secure. When using Cloudflare a visitor has an encrypted connection between their browser and a Cloudflare server. Then Cloudflare should encrypt the connection between your webserver and the Cloudflare network. You can check your settings under the “SSL/TLS” tab. The problem with full is that Cloudflare will accept certificates not signed by a certificate authority. In theory, this could allow an attacker to imitate your web server. Instead, you can use Full-Strict mode which requires a valid signed certificate on your website. To receive a valid signed certificate for free, you can either use LetsEncrypt or the Cloudflare origin certificate.
Conclusion
Cloudflare is a great service (especially for the free price tag) that can speed up and secure your website. Depending on the size of your website it may be worthwhile to look into their Pro plan which includes things like a Web Application Firewall (a must need for a WordPress site) or additional performance options. Good luck and utilize the information on this page to ensure your website is secure and stays online.
*Cloudflare is a registered trademark of Cloudflare, Inc.* This website, and article, are not in affiliation with or endorsement, sponsorship, or support of Cloudflare.
-Images and trademark are utilized within the Cloudflare Trademark guidelines.